Beefy Rice
")
Don’t confuse this Beefy Rice with brown rice. I am not a lover of brown rice and I love this rice. I have served it many times for family parties and everyone loves it. The best part – it is so easy to make. You just dump all the ingredients in a 9 x 13 baking pan and bake it in the overn. You do need to plan ahead though. It take 1 1/2 hours to bake.
1/2 cup Brummel and Brown butter, melted
2 (10.5 oz.) cans beef consome
2 soup cans of water
1 tsp. garlic granules
1/4 tsp. chicken bouillon granules
2 cups long grain rice

Preheat oven to 350 degrees.
Place cube of margarine in a 9 x 13 baking dish. Put in microwave until melted.
")
Add all other ingredients to the pan –
") 2 cans of beef consome.
2 cans of beef consome.
") 2 soups cans of water.
2 soups cans of water.
") 1 tsp. garlic granules.
1 tsp. garlic granules.
") 1/4 tsp. chicken bouillon granules.
1/4 tsp. chicken bouillon granules.
") Stir together to dissolve garlic and chicken bouillon.
Stir together to dissolve garlic and chicken bouillon.
")
Add rice. Distribute rice as evenly as possible. (I look at the side of the pan to see the rice to make sure that it is as even as possible.)
Cook uncovered for 45 minutes and then cover and cook an additional 45 minutes.
")
Makes approximately 16 – 1/2 cup servings
Recipe Source: Revised from Anita F.
Full recipe without pictures –
BEEFY RICE
1/2 cup Brummel and Brown butter, melted
2 (10.5 oz.) cans beef consome
2 soup cans of water
1 tsp. garlic granules
1/4 tsp. chicken bouillon granules
2 cups long grain rice
Preheat oven to 350 degrees.
Place cube of margarine in a 9 x 13 baking dish. Put in microwave until melted.
Add all other ingredients to the pan.
Distribute rice as evenly as possible. (I look at the side of the pan to see the rice to make sure that it is as even as possible.)
Cook uncovered for 45 minutes and then cover and cook an additional 45 minutes.
Makes approximately 16 – 1/2 cup servings
Chicken with Mushroom Sauce

This wonderfully easy chicken recipe is my “Go-to” meal. It is so fast and easy to throw together in just a few minutes, but still so delicious. I have shared this chicken with so many friends and everyone loves it. I make a couple recipes of the sauce at the same time and freeze it in zip locks bags. When I am ready to make it – I just thaw the sauce, cut off the corner of the bag, squeeze it onto the chicken – and voila! dinner is ready!
6 chicken breasts (4 oz. each)
pepper
1 can cream of mushroom soup
1 cup grated cheese
3 T. green onions
1 tsp. sage
Line baking dish with foil.
Place chicken in pan and sprinkle with pepper.
Mix together soup, cheese, green onions and sage – spoon over chicken.
")
Bake at 350 degrees for 1 hour.
This sauce looks kind of ugly because of the sage but this is an excellent recipe that I have served many friends for years and everyone loves it. The sauce tastes really good on a baked potato or Stove Top stuffing.
Freeze Ahead: Sauce can be frozen in a zip lock bag to be used later. It is a little bit more runny than using it before freezing it but it still tastes just as good.
Full recipe without pictures –
CHICKEN WITH MUSHROOM SAUCE
6 chicken breasts (4 oz. each)
pepper
1 can cream of mushroom soup
1 cup grated cheese
3 T. green onions
1 tsp. sage
Line baking dish with foil.
Place chicken in pan and sprinkle with pepper.
Mix together soup, cheese, green onions and sage – spoon over chicken.
Bake at 350 degrees for 1 hour.
This sauce looks kind of ugly because of the sage but this is an excellent recipe that I have served many friends for years and everyone loves it. The sauce tastes really good on a baked potato or Stove Top stuffing.
Zucchini Bread

")
The brown sugar in this recipe makes it THE BEST zucchini bread ever! It can even be made into muffins which makes a nice portable snack or treat to share. Baking instructions are below.
Preheat oven to 350 degrees.
Mix together:
5 eggs
1 ½ cups brown sugar
1 ½ cups white sugar
1 ½ cups oil
")
Add and mix well:
4 ½ cups flour
1 ½ tsp. soda
1 ½ tsp. baking powder
1 ½ tsp. nutmeg
3 tsp. cinnamon
¾ tsp. salt
")
Add:
1 ½ tsp. vanilla
3 cups grated zucchini
")
FYI: Grated zucchini freezes very well – just make sure that when you thaw it and add it to a recipe, you add the water in the bag. This is the moisture that came out of the zucchini when it was frozen. Without it, the bread will be very dry. I measure out the correct amount of grated zucchini before I freeze it and mark the bag with the correct amount. Frozen and then thawed zucchini measures differently than fresh grated zucchini
Grease and flour 2 large loaf pans. Split the batter between the two pans.
")
Bake at 350 for 50 – 60 mins. Check with a toothpick to make sure it is done.
")
.
Note: In my medium/small tins this recipe makes 7 loaves. Bake approximately 40 – 42 minutes.
")
MUFFINS: Only fill cupcake papers half full – otherwise they look like the picture below – not pretty! Bake at 350 degrees for 19 minutes.
")

Zucchini grows in great abundance here in Utah. I grate, pre-measure, and freeze zucchini so I can make this delicious Zucchini Bread all year long. Since it makes 2 large loaves, it is great to share one with a neighbor or friend.
Food Storage: Using your frozen zucchini and powdered eggs, makes this a great food storage treat.
FULL RECIPE WITHOUT PICTURES —
Preheat oven to 350 degrees.
Mix together:
5 eggs
1 ½ cups brown sugar
1 ½ cups white sugar
1 ½ cups oil
Add and mix well:
4 ½ cups flour
1 ½ tsp. soda
1 ½ tsp. baking powder
1 ½ tsp. nutmeg
3 tsp. cinnamon
¾ tsp. salt
Add:
1 ½ tsp. vanilla
3 cups grated zucchini
Grease and flour 2 large loaf pans
Bake at 350 for 50-60 mins.
MUFFINS: Only fill cupcake papers half full – otherwise they spill over the top and look really ugly. Bake at 350 degrees for 19 minutes.
FYI: Grated zucchini freezes very well – just make sure that when you thaw it and add it to a recipe, you add the water in the bag. This is the moisture that came out of the zucchini when it was frozen. Without it, the bread will be very dry. I measure out the correct amount of grated zucchini before I freeze it and mark the bag with the correct amount. Frozen and then thawed zucchini measures differently than fresh grated zucchini.
Food Storage: Using your frozen zucchini and powdered eggs makes this a great food storage treat.
Note: In my medium/small tins this recipe makes 7 loaves. Bake approximately 40 – 42 minutes.
Nuts and Berries Salad
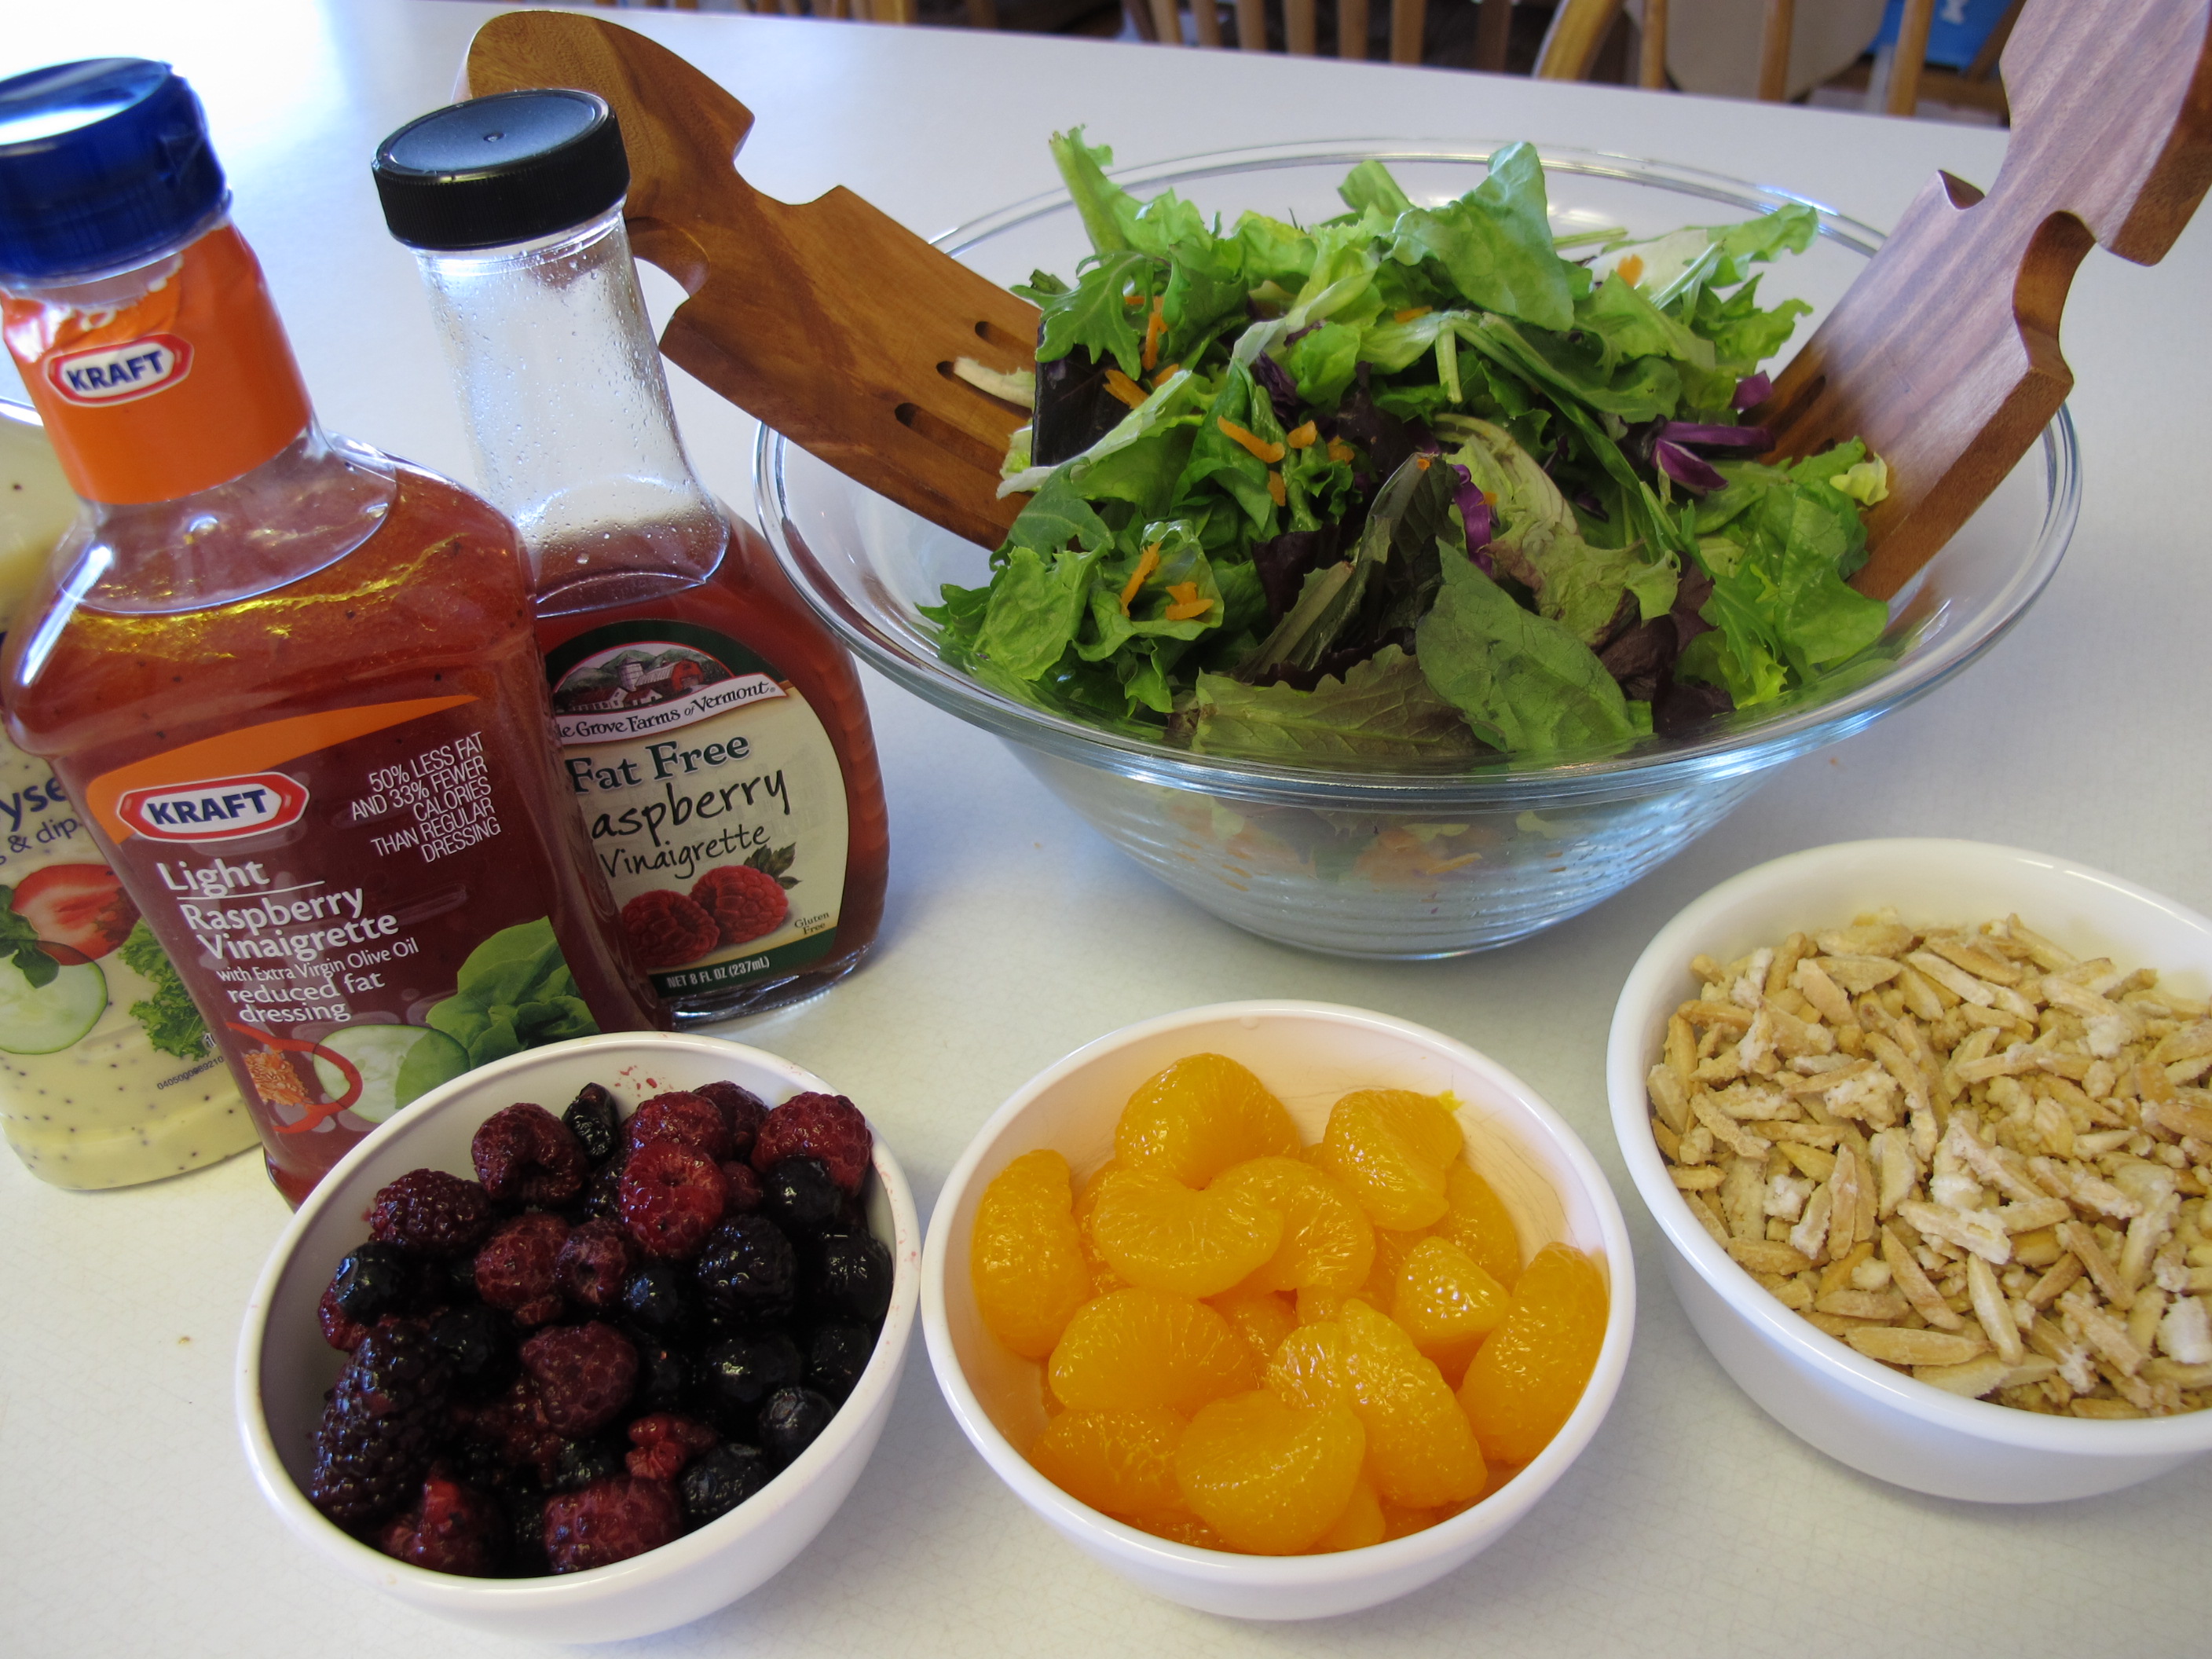
This is such a refreshing cool salad. I simply thawed some frozen berries. I buy a bag of mixed berries at Costco . It includes raspberries, blackberries and blueberries. I also opened a small can of mandarin oranges. These, added to mixed greens and topped it with sugar-glazed almonds made for a beautiful colorful salad. We topped it with Kraft Light Raspberry Vinaigrette salad dressing.
The recipe for sugar-glazed almonds is listed under the SIDES tab.
Sugar-Glazed Almonds
")
Sugar-glazed almonds taste SO good sprinkled in a salad and they are so easy to make.

The ratio of nuts to sugar is 2 to 1. This picture is 1 cup of slivered almonds with 1/2 cup sugar. Add nuts and sugar to a frying pan. On medium heat, continue to stir nuts as the sugar starts to melt. DO NOT turn your back on these!!! They burn so easy.
")
Continue to stir sugar and nuts together as the sugar melts. In the picture below, you can see how the sugar is starting to clump a bit. Continue stirring until the sugar is melted. Pour almonds onto a cookie sheet to cool.
")
We added these to a Nuts and Berries Salad. It was delicious!

Slow Cooker Lasagna
")
")
At the last minute, I decided to add mushrooms so they are not shown in this pictures.
(Note: Since I am usually cooking for only two – pictures show 1/2 the recipe
2 pounds lean ground turkey (or lean ground beef)
1 T. garlic granules
1/2 tsp. pepper
2 tsp. italian seasoning
2 tsp. seasoned salt
12 oz. sliced mushrooms (optional)
Cook ground turkey (or ground beef). Add seasonings. Add mushrooms.
")
16 oz. fat-free cottage cheese
2 cups shredded mozzarella cheese
Combine cottage cheese and mozzarella cheese.
")
2 – 26 oz. jars marinara sauce (with garlic and italian spices)
Add a thin layer of marinara sauce to the bottom of the crock pot.
")
Add a layer of the ground turkey (or ground beef) mixture.
")
1 – 9 oz. package lasagna noodles, uncooked
Add a layer of noodles, breaking the noodles to make them fit. It’s ok to overlap them.
")
Top the noodle layer with a layer of the cheese mixture.
")
Repeat until all the ingredients are used, ending with a layer of sauce.
Cover and cook on low for 6 – 8 hours.
1/4 – 1/2 cup shredded mozzarella cheese
A few minutes before serving, top with mozzarella cheese. Serve after the cheese has melted.
")
Substitutions: Ricotta cheese instead of cottage cheese
Full recipe without pictures
SLOW COOKER LASAGNA
2 pounds lean ground turkey (or lean ground beef)
1 T. garlic granules
1/2 tsp. pepper
2 tsp. italian seasoning
2 tsp. seasoned salt
12 oz. cans sliced mushrooms (optional)
16 oz. fat-free cottage cheese
2 cups shredded mozzarella cheese
2 – 26 oz. jars marinara sauce (with garlic and italian spices)
1 – 9 oz. package lasagna noodles
1/4 – 1/2 cup shredded mozzarella cheese – for topping
Cook ground turkey (or ground beef). Add seasonings. Add mushrooms.
Combine cottage cheese and mozzarella cheese.
Add a thin layer of marinara sauce to the bottom of the crock pot.
Add a layer of the ground turkey (or ground beef) mixture.
Add a layer of noodles, breaking the noodles to make them fit. It’s ok to overlap them.
Top the noodle layer with a layer of the cheese mixture.
Repeat until all the ingredients are used, ending with a layer of sauce.
Cover and cook on low for 6 – 8 hours.
A few minutes before serving, top with mozzarella cheese. Serve after the cheese has melted.
Makes 8 servings – (this is a very large serving)
Recipe Source: Recipe Girl
Feta Capered Salmon
If you have never cooked with capers before, don’t let them scare you. They are delicious – especially combined with the feta in this savory salmon recipe. This is a dish we will definately make over and over. It is delicious! It looks like you spent a lot of time in the kitchen but it is so fast and easy.
")
Salmon filets
olive oil
1/2 lemon
2 T. dry Hidden Valley Ranch salad dressing
1/2 tsp. italian seasoning
1/2 tsp. garlic granules
1/2 tsp. paprika
1/2 tsp. salt
fresh or bottled chopped garlic
feta cheese, crumbled
capers
")
These are the seasonings used in this recipe.
Rinse salmon filets and pat dry with paper towels. Place in a foil lined 9 x 13 baking dish.
Brush lightly with olive oil.
Squeeze 1/2 lemon over fish.
Combine ranch dressing, italian seasoning, garlic granules, paprika and salt. Sprinkle liberally over fish.

Sprinkle fresh or bottled garlic over fish.
Sprinkle feta over the fish. Top with drained capers. Use A LOT of feta and capers – more than you think! This is the best part!
Lastly, lightly drizzle with olive oil again.
Bake in preheated oven at 375 degrees for 15 – 20 minutes – depending on the thickness of the filets. Salmon will flake with a fork when done. For the last 3 – 5 minutes, place fish under the broiler to toast the cheese.
")
Recipe source: Revised from The Sisters Cafe – Salmon with Feta and Capers
Full recipe without pictures –
FETA CAPERED SALMON
Salmon filets
olive oil
1/2 lemon
2 T. dry Hidden Valley Ranch salad dressing
1/2 tsp. italian seasoning
1/2 tsp. garlic granules
1/2 tsp. paprika
1/2 tsp. salt
fresh or bottled chopped garlic
feta cheese, crumbled
capers
Rinse salmon filets and pat dry with paper towels. Place in a foil lined 9 x 13 baking dish.
Brush lightly with olive oil.
Squeeze 1/2 lemon over fish.
Combine ranch dressing, italian seasoning, garlic granules, paprika and salt. Sprinkle liberally over fish.
Sprinkle fresh or bottled garlic over fish.
Sprinkle feta over the fish. Top with drained capers. Use A LOT of feta and capers – more than you think! This is the best part!
Lastly, lightly drizzle with olive oil again.
Bake in preheated oven at 375 degrees for 15 – 20 minutes – depending on the thickness of the filets. Salmon will flake with a fork when done. For the last 3 – 5 minutes, place fish under the broiler to toast the cheese.
Cracked Potatoes

Cracked Potatoes are a crazy, fun and different way to prepare your red potatoes.
")
We started out with these standard ingredients – smaller red potatoes work best. Ken, the season expert, added the seasonings pictured below.
red potatoes
olive oil
")
Sea salt, dry Hidden Valley Ranch salad dressing, no-salt seasoning, italian seasoning, garlic granules and paprika. He mixed all of these to sprinkle on the potatoes.
2 T. dry Hidden Valley Ranch salad dressing
1/2 tsp. italian seasoning
1/2 tsp. garlic granules
1/2 tsp. paprika
1/2 tsp. no-salt seasoning
1/2 tsp. salt
")
Start with adding salt to a large pan of water. Add whole potatoes and boil until fork-tender.
")
Lightly coat a baking sheet with olive oil. Place tender potatoes on the baking sheet, leaving plenty of room between each potato. With a potato masher, gently press down on each potato until it slightly mashes, rotate the masher 90 degrees and mash again.")
Brush the tops of each cracked potato with more olive oil. (Sorry – my pans are well used!)
")
Sprinkle potatoes with your season mixture. You can use the ones we did, or any of your favorite seasonings.
")
Bake in a 450 degree oven for 20 – 25 minutes until golden brown.
Recipe Source: revised from Pioneer Woman – Crash Hot Potatoes
Full recipe without pictures
CRACKED POTATOES
red potatoes
olive oil
2 T. dry Hidden Valley Ranch salad dressing
1/2 tsp. italian seasoning
1/2 tsp. garlic granules
1/2 tsp. paprika
1/2 tsp. no-salt seasoning
1/2 tsp. salt
Start with adding salt to a large pan of water. Add whole potatoes and boil until fork-tender.
Lightly coat a baking sheet with olive oil. Place tender potatoes on the baking sheet, leaving plenty of room between each potato. With a potato masher, gently press down on each potato until it slightly mashes, rotate the masher 90 degrees and mash again.
Brush the tops of each cracked potato with more olive oil.
Sprinkle potatoes with your season mixture. You can use the ones we did, or any of your favorite seasonings.
Bake in a 450 degree oven for 20 – 25 minutes until golden brown.
Crock Pot Baked Potatoes
Why didn’t I realize years ago that potatoes could be baked in a crock pot! This is great, especially when you are not home in time to put the potatoes into the oven. Plus, using your crock pot doesn’t heat up your kitchen like the oven does. ")
After washing the potatoes, lay them on a piece of foil and either smear them with butter or spray them with I Can’t Believe it’s Not Butter and then wrap them up. You can salt them too, if you like.

I have found that it is a good idea to wad up some foil and put it in the bottom of your crock pot. This prevents the bottom potatoes from getting a “hot spot” which causes a little crisper spot. Not a big deal if you don’t have the space, but if you do, it’s a good idea. Since the foil doesn’t get soiled, you can save it and use it over and over.
")
Since I am usually only cooking for two, this picture is my small crock pot that I have been using quite a bit. Perfect size for two people.
You can cook the potatoes on low or high, depending on the amount of time that you have. The time, of course, depends on the size of the potatoes. You really can’t overcook them in a crock pot.

Buttering the potatoes makes the skin nice and soft. Baked potatoe pictured with Chicken with Mushroom Sauce.
Freezer Meals
I love to plan ahead and have meals ready to go in the freezer. On a busy day, having a great meal already prepared, just makes me happy. If you are already making a mess in the kitchen, make twice or three times as much, put it in a freezer bag and – Voila! Dinner is ready for another night!
As you can see from the picture below, I freeze meals as flat as I can. This makes it easy to store in the freezer and takes up less space. After filling the freezer bag, I lay them flat on a cookie sheet or in a 9×13 casserole pan and put them in my larger freezer until they are frozen solid and then “file” them in my indoor freezer. This picture is one side of my “chest” style freezer that is below my frig.
")
In that little space I have 5 meals of Spaghetti sauce, 5 meals of Skinny Chimichanga meat, 3 meals of Chicken with Mushroom Sauce (sauce only), and 2 meals of Ranchers Chili. 15 meals at my fingertips. Love it! And more meals could fit in on the sides. I better get cooking! Make sure you write on the bag with a Sharpie marker before filling the bag.
